


Propagating Anubias: Expert Guide for Aquarium Plants
Anubias stands as one of the most resilient and popular aquarium plants available today, prized for its hardy nature and ability to thrive in various water conditions. For aquarium enthusiasts looking to expand their planted tanks without breaking the budget, propagating Anubias offers a rewarding and cost-effective solution. This slow-growing West African native produces lush, dark green leaves that add depth and texture to any aquascape, and its propagation process remains surprisingly straightforward once you understand the fundamental techniques. Whether you're working with Anubias barteri varieties or other species, mastering these propagation methods will help you create a thriving underwater garden while building your plant collection organically.
Understanding Anubias Growth Patterns
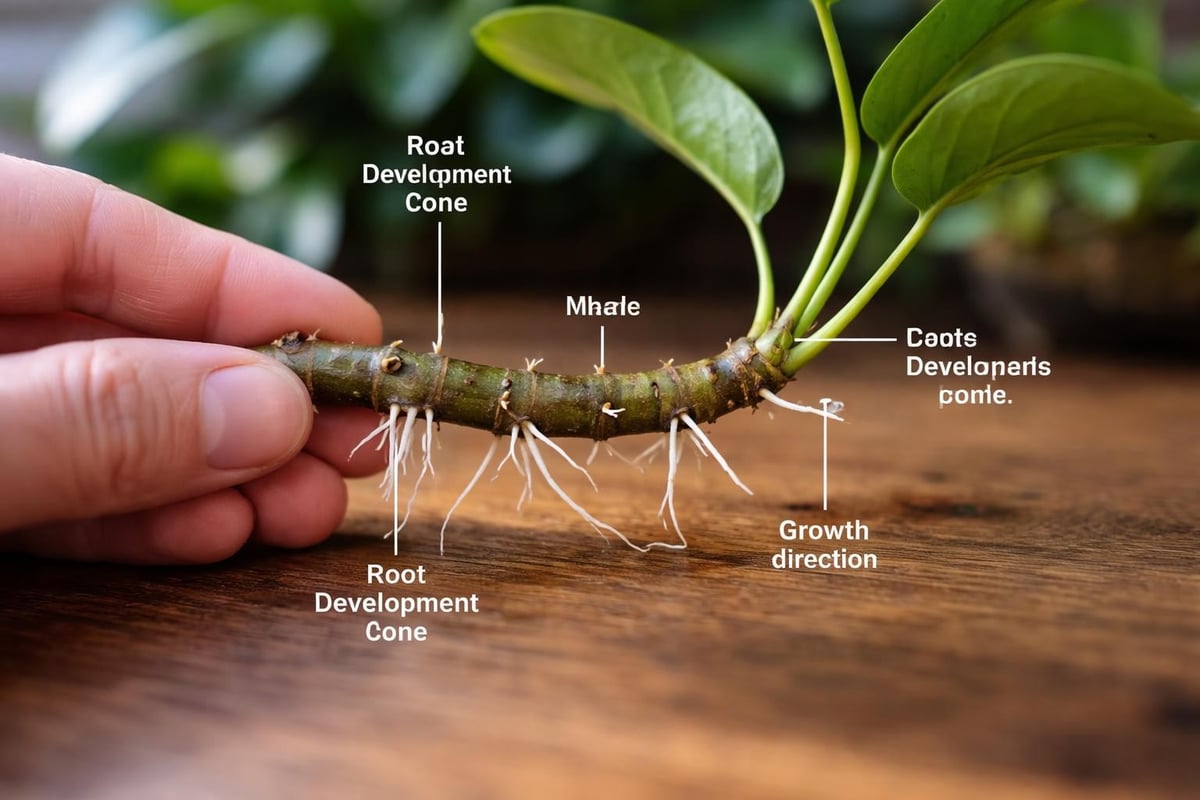
Before attempting propagation, understanding how Anubias grows naturally provides critical insight into successful multiplication techniques. Anubias plants develop from a horizontal stem called a rhizome, which serves as the main anchor point for both roots and leaves. This rhizome grows slowly along surfaces, producing new leaves at regular intervals while extending its reach across driftwood, rocks, or substrate.
The rhizome structure makes Anubias particularly well-suited for vegetative propagation. Unlike stem plants that require constant trimming, Anubias maintains a compact growth habit with leaves emerging directly from the rhizome nodes. Each node possesses the potential to develop into a new growth point when conditions favor development.
Key Growth Characteristics
- Rhizome thickness: Ranges from pencil-thin to finger-width depending on species
- Leaf production rate: Typically one new leaf every 2-4 weeks under optimal conditions
- Root development: Adventitious roots emerge from rhizome undersides
- Growth direction: Horizontal expansion along surfaces rather than vertical height
Understanding these patterns helps determine the best timing and locations for making propagation cuts. Mature plants with established rhizomes measuring at least 4-6 inches provide the best candidates for division.
Essential Tools and Preparation
Proper preparation ensures clean cuts and minimizes stress on both parent and daughter plants during the propagation process. Gathering the right tools before starting prevents unnecessary delays and reduces the risk of damaging your valuable Anubias specimens.
Required Tools:
- Sharp scissors or pruning shears - Sterilized with rubbing alcohol or boiling water
- Clean cutting board or work surface - Non-porous material that can be sanitized
- Container with aquarium water - For temporary plant storage during division
- Paper towels - To gently dry the rhizome for better visibility
- Optional: Rooting hormone - Though typically unnecessary for Anubias
The workspace should be well-lit to identify healthy nodes and avoid cutting through critical growth points. Many experienced aquarists recommend removing the parent plant from the aquarium entirely for better access and visibility, though some species can be propagated in situ when attached to removable hardscape.
| Preparation Step | Purpose | Time Required |
|---|---|---|
| Tool sterilization | Prevent bacterial infection | 5 minutes |
| Plant removal | Enable clear cutting access | 3-5 minutes |
| Rhizome inspection | Identify cutting locations | 5-10 minutes |
| Workspace setup | Ensure efficient workflow | 5 minutes |
Similar to the care required when maintaining other aquarium plants, cleanliness plays a crucial role in successful propagation outcomes.
Rhizome Division Method
Propagating Anubias through rhizome division represents the most reliable and commonly practiced technique among aquarium hobbyists. This method leverages the plant's natural growth structure to create multiple independent specimens from a single parent plant.
Begin by examining the rhizome carefully to locate natural division points. Ideal cutting locations occur between leaf clusters where the rhizome shows healthy green or brown coloration without any signs of rot or damage. Each division should include at least 3-4 leaves and a corresponding root system to ensure successful establishment.
Step-by-Step Division Process
- Remove the plant from its attachment point - Gently unwrap roots from driftwood or rocks
- Rinse the rhizome - Clear away debris to expose cutting sites
- Identify division points - Select locations with multiple leaves on each side
- Make clean cuts - Use sterilized scissors to cut straight through the rhizome
- Inspect cut surfaces - Ensure cuts appear clean without crushing or tearing
- Separate sections - Carefully pull apart the newly divided sections
The detailed guide on propagating Anubias demonstrates various cutting techniques that experienced growers employ for different scenarios. Each cut creates two new plants, allowing exponential growth of your collection over time.
After division, allow cut surfaces to air dry for 10-15 minutes. This brief drying period helps prevent bacterial infection and promotes faster healing of the wound. Some aquarists report better success rates when allowing cuts to callus slightly before reintroduction to the aquarium environment.
Optimal Attachment and Placement
Once you've successfully divided your Anubias, proper attachment ensures healthy root development and prevents the common mistake of burying the rhizome. The rhizome must remain exposed to water flow, as burying it often leads to rot and plant death.
Attachment Methods:
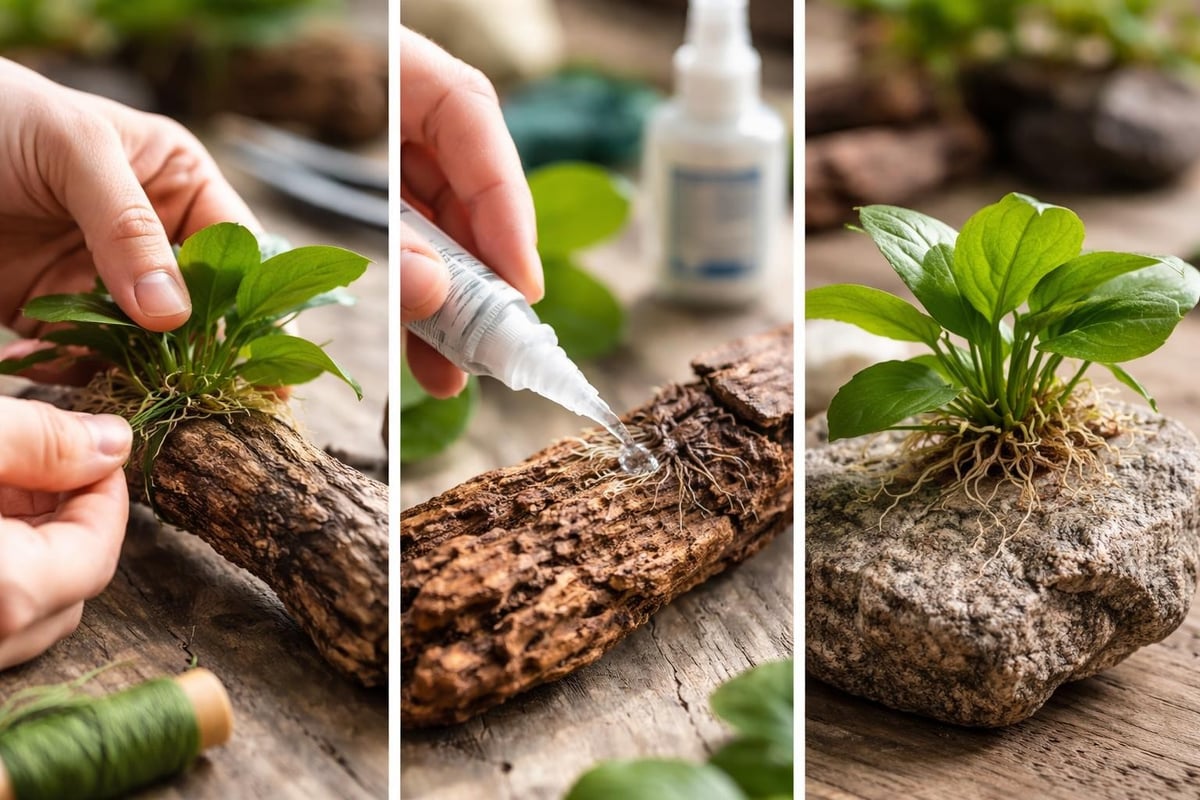
- Cotton thread - Biodegradable and gentle, degrades naturally after roots establish
- Fishing line - Strong and nearly invisible, requires manual removal later
- Super glue gel - Quick bonding for immediate attachment to hardscape
- Rubber bands - Temporary solution until roots grip surfaces naturally
Thread the chosen material around the rhizome and the attachment surface, securing it firmly but not so tightly that it cuts into the plant tissue. Position the rhizome so roots face downward toward the attachment surface while leaves point upward. This orientation mimics natural growth patterns and encourages faster establishment.
Consider placement within your aquarium ecosystem when selecting attachment locations. Anubias tolerates low to moderate lighting, making it ideal for shaded areas beneath taller plants or in corners with reduced light penetration. Areas with gentle water flow promote healthy growth while preventing debris accumulation on broad leaves.
Post-Propagation Care Requirements
Newly propagated Anubias requires slightly different care than established plants during the critical establishment period. The first 2-4 weeks prove most crucial for root development and adaptation to the new growing position.
Monitor water parameters closely during this period, maintaining stability rather than chasing perfect numbers. Anubias tolerates a wide range of conditions but responds poorly to rapid fluctuations in temperature, pH, or hardness.
Critical Care Parameters
| Parameter | Ideal Range | Acceptable Range |
|---|---|---|
| Temperature | 72-78°F | 68-82°F |
| pH | 6.5-7.5 | 6.0-8.0 |
| Lighting | Low-Medium | Very Low-High |
| Water hardness | 3-8 dKH | 2-15 dKH |
Avoid heavy fertilization immediately after propagating Anubias, as the reduced root system cannot efficiently absorb nutrients. Instead, rely on naturally occurring nutrients in the water column and established biofilm. After 3-4 weeks, gradually introduce liquid fertilizers following manufacturer recommendations.
The scientific approach to Anubias care emphasizes the importance of balanced nutrition and appropriate environmental conditions for optimal growth rates. Patience remains essential, as Anubias naturally grows slowly compared to fast-growing stem plants.
Common Propagation Mistakes
Even experienced aquarists encounter challenges when propagating Anubias for the first time. Recognizing and avoiding these common errors significantly improves success rates and plant health outcomes.
Frequent Errors to Avoid:
- Burying the rhizome - Leads to rot within 2-3 weeks
- Cutting too close to leaves - Damages growth nodes and reduces viability
- Using dull cutting tools - Causes crushing rather than clean cuts
- Insufficient leaf count - Divisions with fewer than 3 leaves struggle to establish
- Immediate heavy fertilization - Overwhelms stressed plants
- Impatient replanting - Not allowing cut surfaces to dry adequately
One particularly common mistake involves cutting through the center of a healthy growth point rather than between leaf clusters. This damages the meristem tissue responsible for producing new leaves and can significantly slow or halt growth in that section.
Brown or melting leaves following propagation often indicate stress rather than failure. Anubias frequently sheds older leaves when adapting to new conditions, redirecting energy toward root establishment. New growth emerging from the rhizome signals successful propagation regardless of initial leaf loss.
Advanced Propagation Techniques
Beyond basic rhizome division, several advanced techniques allow for more efficient multiplication of valuable or rare Anubias varieties. These methods require more experience but offer faster results when executed properly.
Multiple Division Strategy
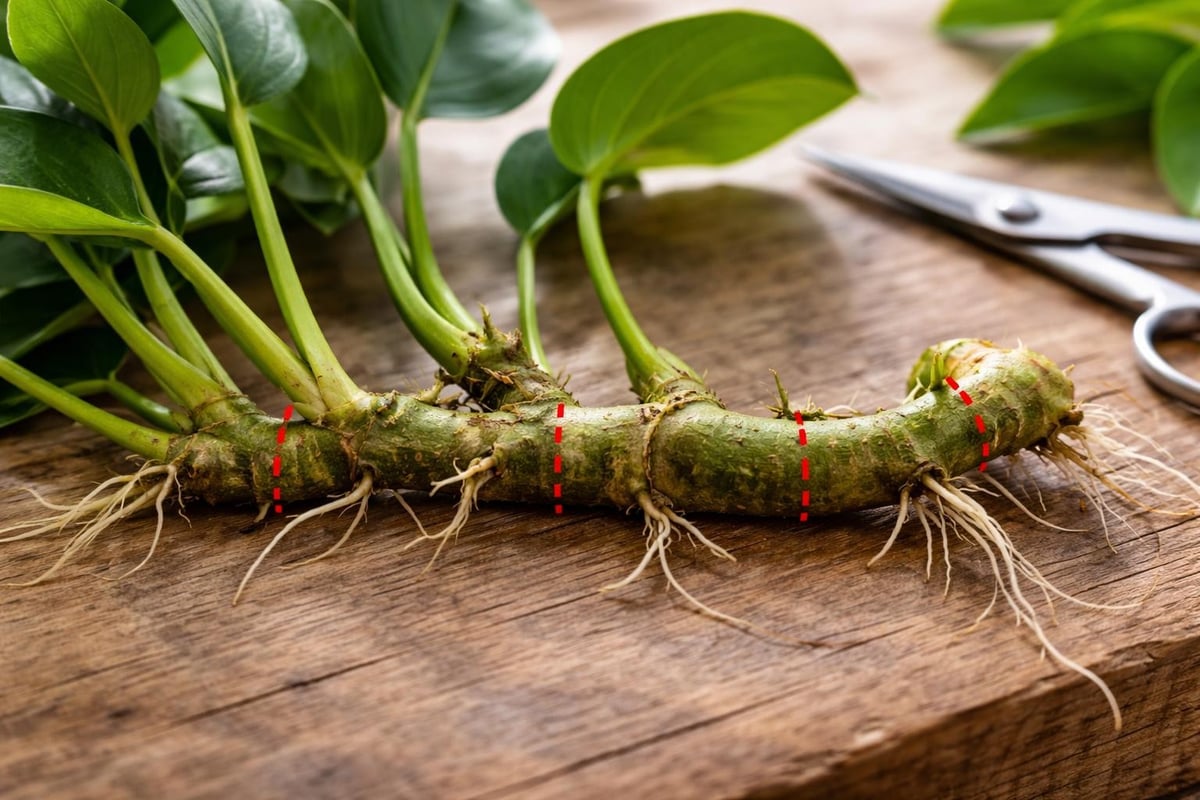
Rather than creating just two plants from one parent, strategic cutting can produce three or more viable sections simultaneously. This approach works best with mature specimens featuring rhizomes measuring 8+ inches with numerous leaf clusters.
Identify multiple cutting points along the rhizome where leaf clusters naturally separate. Make simultaneous cuts to create several independent sections, ensuring each includes adequate leaves and root material. This technique proves particularly valuable when expanding rare Anubias varieties that command premium prices.
The risk increases proportionally with the number of divisions, as smaller sections experience greater stress and require more careful monitoring. However, success yields multiple plants from a single propagation session, accelerating collection growth significantly.
Adventitious Shoot Development
Some Anubias species naturally produce side shoots from the rhizome without intervention. Encouraging this behavior through environmental manipulation can increase propagation opportunities organically. Higher nutrient levels and moderate lighting sometimes trigger increased side shoot production, though results vary by species.
Research into tissue culture and in vitro propagation methods demonstrates advanced techniques used in commercial production. While these methods exceed the capabilities of most home aquarists, understanding the principles helps optimize conventional propagation approaches.
Species-Specific Considerations
Different Anubias species and varieties exhibit unique characteristics that influence propagation success rates and techniques. Recognizing these differences helps tailor your approach for optimal results with each variety in your collection.
Popular Varieties and Propagation Notes:
- Anubias Barteri - Largest variety, produces thick rhizomes ideal for multiple divisions
- Anubias Nana - Compact size, slower growth requires patience between divisions
- Anubias Nana Petite - Miniature variety, demands precision cutting due to small rhizome
- Anubias Coffeefolia - Textured leaves, propagates reliably using standard methods
- Anubias Hastifolia - Arrow-shaped leaves, longer rhizome sections between nodes
The comprehensive guide to various Anubias species details specific care requirements that extend to propagation considerations. Smaller varieties like Nana Petite require more careful handling and longer establishment periods compared to robust species like Barteri.
When building a diverse collection from Canton Aquatics' Anubias selection, consider starting with heartier varieties to build confidence before attempting propagation of more delicate or expensive specimens. Success with common varieties provides valuable experience applicable to rarer types.
Timing Your Propagation Efforts
Selecting the optimal time for propagating Anubias significantly impacts success rates and recovery speed. While these hardy plants tolerate division year-round, certain periods offer distinct advantages for both plant health and aquarium maintenance schedules.
Spring and early summer represent ideal propagation windows when increasing daylight hours and stable temperatures promote faster growth and recovery. Plants divided during these seasons establish more quickly and resume normal growth patterns within 4-6 weeks.
Seasonal Considerations
- Spring (March-May): Optimal growth period, fastest establishment
- Summer (June-August): Active growth continues, monitor temperature carefully
- Fall (September-November): Acceptable timing, slightly slower recovery
- Winter (December-February): Possible but slowest establishment period
Beyond seasonal timing, consider the plant's individual growth cycle. Propagate when the parent plant displays active growth with new leaves emerging regularly. Dormant or stressed plants require recovery time before undergoing the additional stress of division.
Coordinate propagation activities with routine aquarium maintenance to minimize disturbance. Combining division with scheduled water changes and aquascaping adjustments streamlines the process and reduces repeated handling of plants and hardscape.
Troubleshooting Common Issues
Despite careful preparation and technique, complications occasionally arise during and after propagating Anubias. Quick recognition and appropriate responses prevent minor setbacks from becoming complete failures.
Problem-Solution Matrix:
| Issue | Likely Cause | Solution |
|---|---|---|
| Rhizome turning black | Bacterial rot from burial | Remove from substrate, trim affected areas |
| No new growth after 8 weeks | Insufficient nutrients | Introduce diluted liquid fertilizer |
| Leaves developing holes | Nutrient deficiency | Check potassium and iron levels |
| Roots failing to attach | Poor surface texture | Relocate to rougher hardscape surface |
| Continued leaf melting | Temperature shock | Verify stable water temperature |
Black or mushy rhizome tissue indicates serious problems requiring immediate intervention. Remove affected sections with sterilized tools, cutting back to healthy green tissue. Examine remaining sections for signs of spreading rot and treat preventatively if necessary.
Yellow or transparent new leaves often signal lighting issues rather than propagation problems. While Anubias tolerates low light, extremely dim conditions can cause chlorosis in emerging growth. Slight increases in lighting duration or intensity typically resolve this issue within 2-3 weeks.
Maximizing Propagation Success
Implementing best practices throughout the propagation process maximizes success rates and produces healthier, more vigorous plants. These refinements distinguish adequate results from exceptional outcomes that experienced aquarists consistently achieve.
Start with the healthiest parent plants available from your collection or from quality sources like Canton Aquatics. Vigorous parent plants with rich green coloration and active growth transfer these positive characteristics to divided sections, ensuring robust offspring.
Document your propagation activities to track success rates across different species, techniques, and seasonal variations. Simple notes recording division dates, methods used, and establishment timelines help refine your approach over time. Photography provides visual records of technique evolution and plant development.
Success Optimization Checklist:
- Sterilize all tools before and between cuts
- Select mature rhizomes with multiple healthy growth points
- Ensure each division contains minimum 3-4 leaves and visible roots
- Allow cut surfaces to dry 10-15 minutes before reattachment
- Secure plants firmly but gently to attachment surfaces
- Position in appropriate lighting zones based on species requirements
- Monitor daily for first two weeks, then weekly thereafter
- Resist fertilization urges until roots visibly establish
Consider maintaining a dedicated propagation area or tank where newly divided plants can establish without competition from established specimens. This controlled environment allows precise parameter management and easier monitoring during the critical establishment phase.
The techniques and principles discussed here apply broadly across aquarium plant cultivation, complementing knowledge gained from resources about low-light plant care and general aquatic gardening practices.
Integration Into Aquascaping Design
Successfully propagated Anubias opens creative possibilities for aquascaping projects that leverage the plant's unique growth characteristics and versatility. Strategic placement of multiple Anubias specimens creates visual depth and natural aesthetics that mature beautifully over time.
Use larger Anubias varieties as midground focal points, attaching them to prominent driftwood or rock formations where their substantial leaves command attention. Smaller varieties like Nana Petite work exceptionally well as foreground accents or attached to smaller stones scattered throughout the aquascape.
Creating Anubias "forests" by clustering multiple propagated plants on a single large piece of driftwood produces stunning visual impact. Vary the species and varieties within these groupings to introduce textural diversity while maintaining the cohesive aesthetic that shared genus members provide.
The ultimate guide to aquarium driftwood offers valuable insights into selecting and preparing hardscape materials ideal for Anubias attachment. Proper hardscape selection enhances both plant health and overall aquascape aesthetics.
Long-Term Maintenance of Propagated Plants
Once propagated Anubias establishes successfully, ongoing maintenance ensures continued health and allows for future propagation cycles. These hardy plants require minimal intervention compared to demanding species, making them ideal for aquarists seeking low-maintenance options.
Remove dead or dying leaves promptly to prevent decay and maintain water quality. Gently wipe broad leaves monthly to remove algae buildup and debris that can block light absorption. This simple maintenance task significantly improves plant appearance and photosynthetic efficiency.
Plan for future propagation as your plants mature. Most Anubias specimens benefit from division every 12-18 months, which rejuvenates growth and prevents overcrowding. This regular propagation cycle maintains plant health while continuously expanding your collection or providing specimens to share with fellow hobbyists.
Monitor for pest issues including snails, which rarely damage healthy Anubias but may feed on decaying leaves. The plant's thick, leathery foliage generally resists herbivorous fish, though some species may occasionally nibble new growth. Selecting compatible tank mates prevents these rare issues from developing.
Mastering the art of propagating Anubias empowers aquarium enthusiasts to build impressive planted tanks while developing valuable horticultural skills applicable across aquatic gardening. The techniques and principles outlined here provide a foundation for successful propagation that yields healthy, vigorous plants capable of thriving for years in your aquatic environment. At Canton Aquatics, we support your aquarium journey with high-quality Anubias specimens, comprehensive care resources, and expert guidance to help you create the thriving underwater landscape you envision.
Ready to Upgrade Your Aquarium?
Check out our shop for a variety of fresh, farm-grown plants! Find the perfect options to enhance your aquarium today.
FEATURED BLOG
Dwarf Cardinal Plant Care Guide: Lobelia Cardinalis for Planted Aquariums


July 14, 2026
Dwarf Cardinal Plant Care Guide: Lobelia Cardinalis for Planted Aquariums
Aquarium Plants That Don't Need Substrate: Epiphytes, Floaters & Column Feeders


July 1, 2026
Aquarium Plants That Don't Need Substrate: Epiphytes, Floaters & Column Feeders
Best Pressurized CO2 Systems for Planted Aquariums: 2026 Buyer's Guide


July 1, 2026
Best Pressurized CO2 Systems for Planted Aquariums: 2026 Buyer's Guide
Going on Vacation? How to Keep Your Planted Tank Alive While You're Away


July 1, 2026
Going on Vacation? How to Keep Your Planted Tank Alive While You're Away
How Long Can Aquarium Plants Survive Without Light?


July 1, 2026
How Long Can Aquarium Plants Survive Without Light?
Best Aquarium Plants for Rainbowfish: Colorful Tank Setup Guide


July 1, 2026
Best Aquarium Plants for Rainbowfish: Colorful Tank Setup Guide
- Choosing a selection results in a full page refresh.

!